Key points:

Backups of SAP HANA Cloud enable data restoration in case of emergency.

SAP HANA Cloud includes automatic backups by default, requiring no manual intervention.

Additionally, you can export and import data from individual HDI containers.
Data from different applications in the same SAP HANA Cloud database is separated with the use of so-called HDI containers. In technical terms, creating a backup means exporting an HDI container and storing it, for example, within your organization’s cloud. Conversely, restoring a backup means importing an HDI container.
Automatic backups
The system automatically creates backups every 15 minutes. A complete backup of the entire database is saved daily and, with default settings, remains available for 14 days. You can adjust the retention period in the database configuration. To estimate the costs of different retention periods, use the SAP HANA Cloud Capacity Unit Estimator.
Under normal circumstances, you do not need to take any additional manual precautions. However, before your first production deployment, you should test the backup restoration process and document it internally. You should also repeat this test at regular intervals. A backup is useless if you cannot restore it correctly and promptly.
At the end of this article, you will find several links to articles that document details and instructions for restoring backups.
Manual Backups
In addition to automatic backups, which cover most cases of data loss or other problems, you can also export and import data manually. This allows you to create manual backups and transfer data to other database instances.
Note: Use this functionality carefully, as it will overwrite existing data.
This guide explains how to export and import individual HDI containers. Since each application in SAP BTP stores its data in a dedicated HDI container, you can create and restore backups individually for each application.
Prerequisites
You need a user who can access the SAP HANA Cockpit and has the rights to export and import data. You also need to know the ID of the HDI container you want to export.
Note: When you create a HANA Cloud database, the system automatically creates a DBADMIN user. This user is necessary to grant another user authorization for creating backups.
Prerequisite 1: Create a new backup user
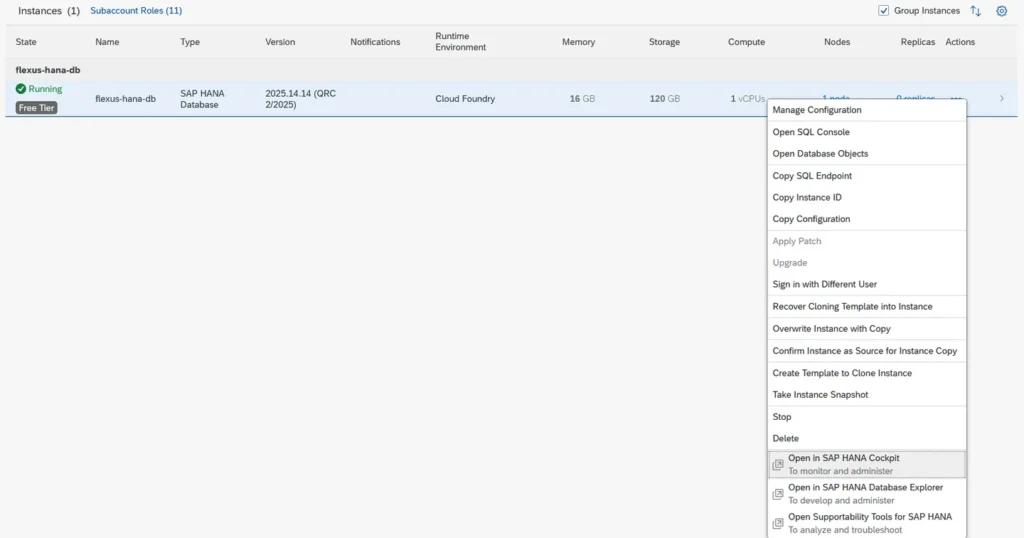
Überprüfen Sie in SAP HANA Cloud Central, ob Sie mit dem DBADMIN-User eingeloggt sind. Über das Aktions-Menü können Sie in das SAP HANA Cockpit wechseln.
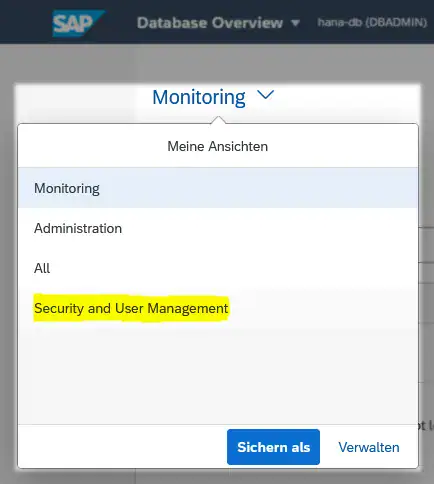
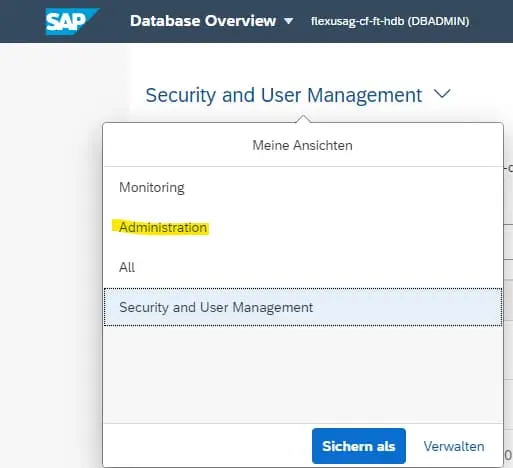
Navigate to the Security and User Management view.
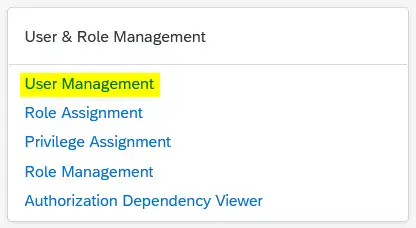
Under User & Role Management, select User Management:
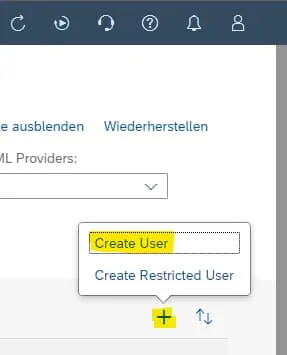
Click + to select the Create User action:
Enter a name and a valid email address for the user. SAP recommends using employee IDs or employee names in production environments so that users can be identified later.
Under Authentication, select the Password checkbox to assign an initial password. Then save the new user by clicking the Save button in the bottom right corner.
Click the < button in the top left to return to the HANA Cockpit. Then click on the heading (currently “Security and User Management”) to switch to the Administration view.
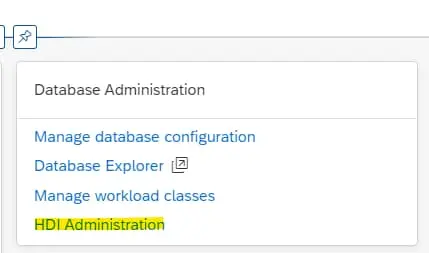
Under Database Administration, select HDI Administration:
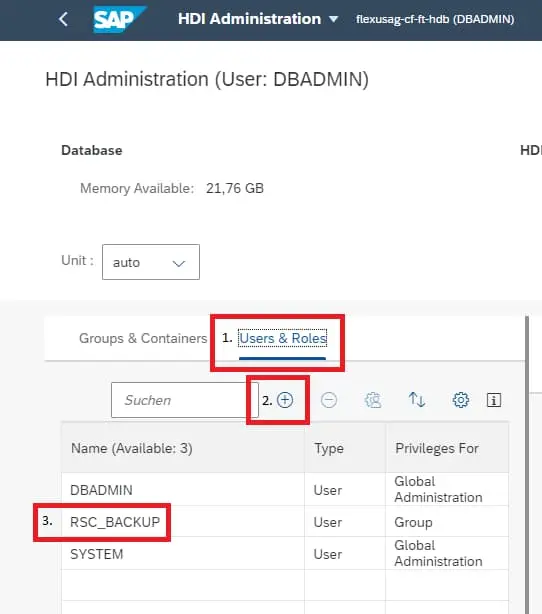
Under Users & Roles (1), add the newly created user by clicking + (2). The system automatically assigns several standard roles for HDI container administration.
Select the user on the left (3):
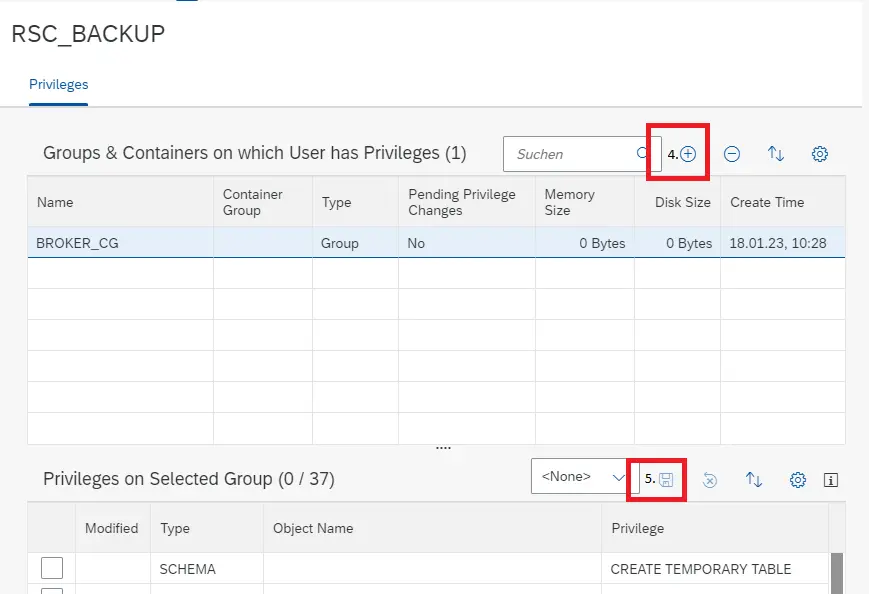
Then click + (4) next to Groups & Containers (see screenshot below). In the dialog, select BROKER_CG and click OK.
Select the new BROKER_CG entry in the Groups and Containers table. This opens the Privileges on Selected Group table below, where you can select which rights to assign to this user. The following objects are required for import and export:
- EXPORT_CONTAINER_FOR_COPY
- EXPORT_CONTAINER_FOR_SUPPORT
- IMPORT_CONTAINER_FOR_COPY
- IMPORT_CONTAINER_FOR_SUPPORT
- M_CONTAINERS
Save your changes. The user is now configured for exporting HDI containers.
To enable this user to access the SAP HANA Database Explorer, complete the following steps:
- Navigate to the SAP HANA Database Explorer using the actions menu in SAP HANA Cloud.
- Click + in the top left corner.
- Select Cockpit Database as the Instance Type, select the database, and clear the Use credentials from cockpit checkbox.
- Enter the backup user credentials in the User/Password fields.
- You may be prompted to update the backup user password.
- The new entry now appears in the Instance List on the left. When you select the HDI Containers folder under the new entry, the HDI container in the database appears in the lower table on the left.
You now have a user who can manually export all data from an HDI container or import it again.
Prerequisite 2: Determine the HDI Container ID
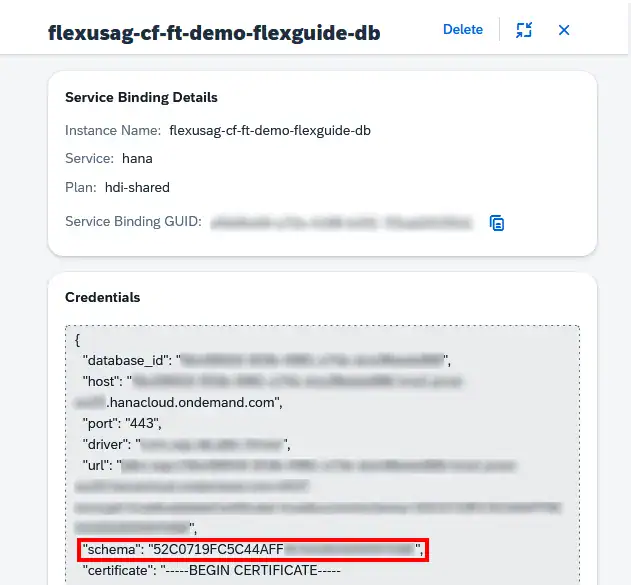
In the SAP BTP Cockpit, navigate to the relevant subaccount and space, then to the application from which you want to export data. Under Service Binding, select the service named hana with the plan hdi-shared.
Click the View Credentials button in the top right corner.
In the detail view that opens on the right, you can view the credentials in JSON format. The HDI container ID is listed under the schema key.
Creating a Backup
After logging in to the SAP HANA Database Explorer, right-click on the instance and select Export HDI Container.
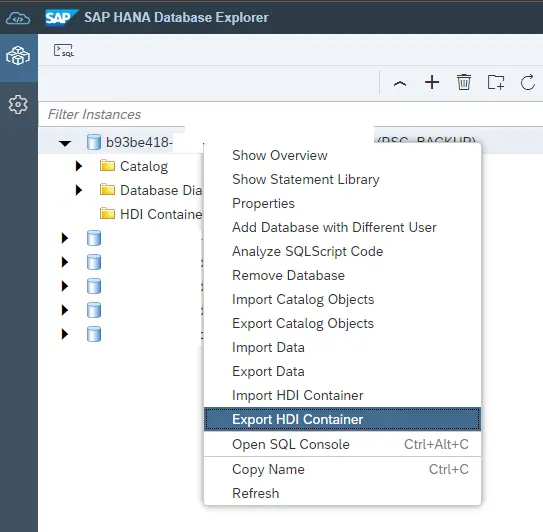
The Export HDI Container Wizard opens on the right side. Select the correct HDI container using the ID you determined earlier. Click Prepare HDI Container for Download and confirm by clicking Prepare to start the export.
A new entry appears in the Background Activities list with the description “Prepare HDI Container ‘<Container ID>’ for download“. When the status changes to SUCCESS, double-click this entry to start the download.
Restoring a Backup
After logging in to the SAP HANA Database Explorer, right-click on the instance and select Import HDI Container.
The Import HDI Container Wizard opens on the right side. Upload a previously exported file.
After uploading, specify the container where you want to restore the backup. Select BROKER_CG as the HDI Container Group and enter the ID of the container you want to overwrite in the Target HDI Container Name field.
Warning: The import process will overwrite all existing data in the target container!
Click Import HDI Container and confirm in the dialog to start the import. The import status is displayed in the Background Activities table.
For more information on automatic backups and restoration procedures, see the following resources: